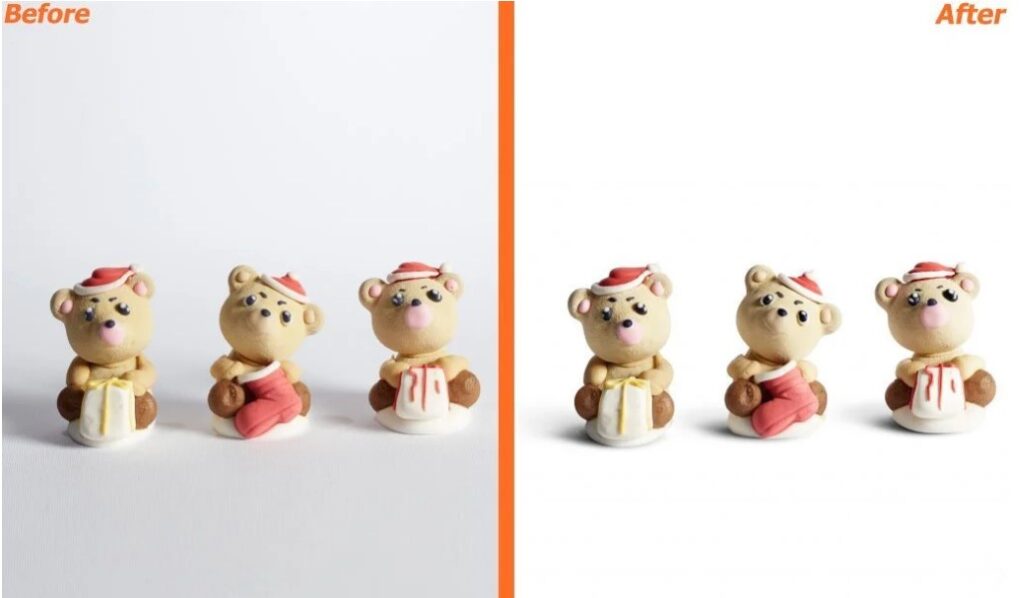
Proper use of Drop Shadow product image in Photoshop can increase your product images from newbie to expert. It enables you to make the product appearance extra natural and realistic by way of adding an experience of form and depth to your products.
In this post, we will discuss how to Drop Shadow product image in Photoshop, step by step. The nice component is it doesn’t take a massive budget or large team to create professional product pictures.
You just need to spend some time on your product images and the submit-production system.
There are many sorts of shadows, but for this weblog, we’re going to attention to the most flexible sort of shadow applicable to all styles of products – drop shadow.
If you’re taking your product pics in a studio, it is able to be difficult to create a suitable shadow, especially in case you’re no longer an expert photographer. Luckily, it’s quite easy to feature a Drop Shadow product image in Photoshop, for the duration of post-production. I’m going to provide an explanation for precisely how to do it step-by-step.
Before we get started
When editing Drop Shadow product image in Photoshop, there are important regulations to recall:
1. Your shadows must look practical.
2. Consistency is fundamental. Be sure to use the equal type of shadow on all your product photographs in the identical class.
Whilst the steps I’ll be sharing right here are smooth to comply with, you want to make certain that in the end, those two fundamental regulations are being accompanied. Otherwise, you’ll simply emerge as having non-expert product photographs on your online store.
12 Step to Drop Shadow product image in Photoshop?
Step 1 – Open Photoshop
To get started out, open your photo in Photoshop. Make certain you’re starting off with an image that has an excessive decision. I’m going to illustrate the system on a white dinner plate that’s already on a white historical past. You may see it appears a bit flat.
Step 2 – Create layers
In the ‘Layers’ panel on the proper aspect of the Photoshop, window chooses your ‘historical past’ layer and duplicate it. You can both proper-click on the layer and pick ‘duplicate Layer’ or hit Ctrl + J (Windows) or Command + J (Mac) on your keyboard. You’ll see a ‘background replica’ appear. This makes it such that you can alter the replica layer without disturbing about accidentally negative or distorting your original image.
Step 3 – Create a course
Create a route around your product in ‘background reproduction’ and remove the background. You may see the heritage has been removed by way of looking carefully on the ‘Layers’ panel; your product must have a grey and white checkered heritage (Photoshop’s way of displaying transparency) within the top layer. Alternatively, you could cover the unique history layers.
Step 4 – reproduction the layer
You need to copy this residue too. A bit enterprise is going an extended way in Photoshop, so get into the dependency of organizing layers. Call this accretion something like ‘Product’. I’d additionally recommend renaming the ‘history reproduction’ layer to something like ‘Shadow’.
Step 5 – choose the shadow layer
Pick your ‘Shadow’ layer, then hit Ctrl + T or Command + T to pick out the transform tool. Maintain down the Ctrl or Command key, then click on the pinnacle-center manipulate factor (the dot at the top of the image) and drag the mouse down to position the remodel at the proper attitude to suit the incoming light supply in your concern. If necessary, use the circulate device to reposition the transformed photograph via clicking and dragging it into location. Don’t fear about it being perfect as you may have a threat to reposition it later.
Step 6 – Lock your layers
For your Layers panel, click on the ‘Lock transparent pixels’ button next to the phrase ‘Lock’. This may ensure the subsequent step only affects the remodel you just made (which will become your shadow). For a few histories on the effective ‘lock transparent pixels’ feature, test out this short academic from SitePoint.
Step 7 – Create a gradient
Pick out the ‘Gradient’ tool (keyboard shortcut ‘G’), then use the drop-down menu next to the gradient bar at the pinnacle of the Photoshop window to choose the 0.33 option down for a black-white gradient. Choose ‘Linear Gradient’ as properly within the menu-bar icons to the proper.
Step 8 – practice the gradient
To apply the gradient, truly click on at the bottom of the shadow closest to your object, then drag toward the ways cease of the shadow. This has to convert your transformed image right into a clean gradient, however, it still gained’t look natural. Allow’s smooth it up now.
Step 9 – free up the layers
First, free up obvious pixels via clicking the identical button you probably did in Step 7.
Step 10 – combination mode
Proper above this button, use the drop-down menu to pick out ‘Multiply’ because of the mixture mode. For plenty of analyzing, click on via to this tutorial on combination modes by means of image weblog forestall.
Step 10 – click ‘filter out’
Click on ‘filter out’ within the Photoshop main menu, then choose ‘Blur’ after which ‘Gaussian Blur’. Choose a pixel radius for the blur. You may test here due to the fact this effect will appearance distinctive relying at the resolution of your photo file and its precise shape. If you cross overboard, use Ctrl + Z or Command + Z to undo one mistake, and control + Shift + Z or Command + Shift + Z to head a couple of steps backward.
Step 11 – remodel
Now you can do some greater remodeling. Allow the ‘loose rework’ device once more and transform your shadow. Try to comply with the mild supply and circulate the shadow as a consequence. This could take some trial and blunders. Also, you could use the ‘Opacity’ function within the ‘Layers’ panel to alter the opacity stage of the shadow. This will make the shadow more diffused.
Step 12 – very last touches:
For a few final touches, take your eraser device (E) and set its opacity to 20-25% and drift to 60%. Right-click on the canvas and set the scale and hardness of your brush. The size of the brush will vary at the image decision. Set Hardness to zero. Hastily brush round your shadow layer to melt any difficult shadow you have probably made. You may use Ctrl + Z/Command + Z to undo your today’s movement. Simply play around till you find something that you are feeling that seems exceptional.